Old Fashioned Intercom?
We have an intercom in our office for letting people through the front gate. It works well, but we have some issues with it. When you arrive at the gate from outside, you can only open it by using a physical key or by calling via the intercom and then waiting for somebody to open it for you from inside. As well as the inconvenience caused to many of our workers by having to wait for someone else to open the gate every day, potentially several times, I was also bothered by the thought that our otherwise hi-tech company was made less efficient (albeit only slightly) because of our reliance on an old fashioned method which used no wireless technologies, no API.
It had to be changed!
So, here’s the intercom:

and here’s the panel for ringing the bell, with integrated camera:

between them, wires connected using a standard scheme, something like this:
We needed to add a REST API which could control both the lock and a web link to the picture from the camera. Also we needed to do it so that the existing UX wasn’t affected: the doorbell and camera had to continue to work as usual, with the door still being able to be opened using the button on the intercom.
Getting the web link to the camera footage is easy enough. We take an ACTi ACD-2100: 
Connect the video feed from the intercom to it and then using the link http://yourip/cgi-bin/encoder?USER=username&PWD=password&SNAPSHOT we have access to the picture.
Adding the REST API is a little more problematic.
Let’s take a look at the doorbell panel’s schematic:
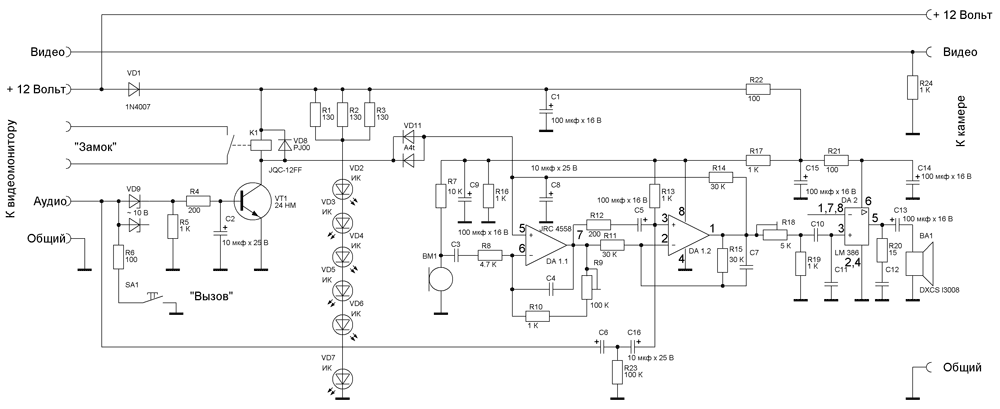
We can see here that all communication between the doorbell panel and the client is implemented through the AUDIO line as follows:
When the doorbell is pressed – the AUDIO line has low voltage level (0v).
When we need to open the lock – the AUDIO line is fed a high voltage (12v) which opens the transistor and the opening relay is triggered.
Normally of course, sound is transmitted through the AUDIO line.
So, simply put, our task was to send a high voltage to the AUDIO line when we needed to open the door.
To make this I used the well known ESP8266 module, specifically esp-07.
In the end it looked something like this:

The board was divided into separate power and logic parts. In the logic part, wi-fi and in the power part, relays and other wires.

In the following schematic, everything get’s put together: 
This simple schematic does everything that we need.
Normally, AUDIO signal passes through a relay and everything works as it always has.
When a high voltage is recorded on PIN 5, the transistor opens, which enables the relay to work and separates the AUDIO line from the client part, joining it instead to +12v. When this happens, it looks exactly as though somebody has pressed the button to open the door.
The photo below shows the completed system. Perhaps you can see that it doesn’t exactly match up with the schematics? That’s because there are some details I’ve included in there to use with planned future features. 
Programming
Using the Sming framework, I wrote the following code:
Now, if the address http://esp-ip/open sends a GET request, a high voltage is sent to pin 5 for 250ms and the door opening mechanism is launched.
Now, having an API we can use to control the door from all devices, the next step is to write an app to utilise it for both Android and iOS:

Now when you arrive at the office you don’t need to open the door with a key, instead you can take your phone and open it. Which is great for several reasons: firstly, that’s 1 less key on your keychain to be carrying around. Secondly, we don’t need to cut lots of keys for all the staff or wait for each other to open the door any more. And thirdly, when the doorbell does ring, even if nobody is near the intercom to let let them in, anybody in the office can use the app to check the camera feed and then let the visitor in direct from their phone. All they need is the app installed on their device and a connection to the office wifi.
Bonus
Having such a powerful wifi module, I simply had to use it for something else too. So as you can see from the code and from the photo below, I added a pressure and temperature sensor (BMP180). Every 15 minutes, all of the information produced by the sensor is sent to a monitoring service and the following informative graph is produced: 
What cool things have you done with the internet of things? Tell us your stories and link us to your projects in the comments below.